Showing posts with label food porn. Show all posts
Showing posts with label food porn. Show all posts
Thursday, January 10, 2013
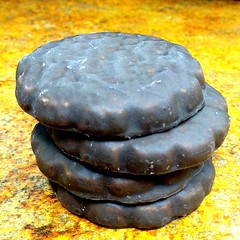
10/365: If you have no willpower - look away.
That's right. "Mint Thins" at dollar general... And they taste the same to me!
Wednesday, January 9, 2013
9/365: What's for breakfast?

I'm on a breakfast kick. I've been having a scrambled egg "Western Omelette" and I'm loving it. Sometimes with toast and jam, sometimes without. Always cooked well done.
I've been thinking it would be good in a warmed tortilla with a little salsa on top too. Breakfast has always been hard for me since I'm not a morning person.
I've got waffle batter in the fridge for tomorrow. We recently bought the waffle iron that was recommended by CI. I have to say it does a great job. I'm pretty excited for waffles tomorrow morning. After that, I'm out of ideas.
It doesn't have to be on the go, because I'm trying to get up earlier so I can just eat and relax with a cup of coffee. I'm in a much better mood during the day when I take the time to do this.
What do you all have for breakfast?
Char
Thursday, January 3, 2013
Wednesday, January 2, 2013

Monday, December 17, 2012

Saturday, December 15, 2012

Wednesday, November 14, 2012
My Pinterest Addiction
Have you all started using Pinterest yet? Pinterest has apparently been around for ages (OK 2 years), but I only
heard of it a few months ago (OK Maybe 6).
If you have no idea what I’m talking about it’s a website
where you create pin boards. You know,
like cork boards of the olden days. YOU
know that you used to cut comics out of the paper and put them up in your
office. It’s like that, but the WEB is
your source. There is SO MUCH stuff out
there.
If you are on Pinterest, you already know what’s up. If you’re not, you are missing out. Hit me up and I’ll send you an invite.
Char
Tuesday, October 30, 2012


Sunday, September 18, 2011

Wednesday, February 2, 2011
Artisian Bread in Five minutes a day
I have to admit. I'm a pretty dismal bread baker. Before Grampy died, he took me through his whole process, which you can see here . I'm glad I did that for so many reasons, not the least of which is that he died less than four months after I did that. Between pictures and video, it is memories of some of the most special times we spent together in the kitchen and talking about all things food related. I love him and miss him so much, and I really can't even look through the pictures without bawling, much less watch the videos. But if you can, I encourage you to. He was an amazing man. By the by, after he died, my Grammie gave me almost all of his bread baking equipment. I'll always treasure it.
When I heard about this recipe for making bread in five minutes a day,and no kneading was involved, I was totally all in. For some reason, I just can't figure out the kneading! If you watch the videos and look at the pictures, you can CLEARLY tell which bread grampy had his hands on, and which bread I had mine on. I know I should practice, because in this case, truly practice does make perfect, but I haven't found the patience for it yet. I will someday, and thankfully, I'll have Grampy by my side showing me how he kneaded the bread with perfection.
The recipe for Artisian Bread in Five minutes a day, is dead simple.
3 cups lukewarm water
1 1⁄2 tbsp granulated yeast (1 1⁄2 packets)
1 1⁄2 tbsp coarse kosher or sea salt
6 1⁄2 cups unsifted, unbleached, all-purpose white flour
Cornmeal for pizza peel
I like to add just a pinch of sugar.
The beauty is in the method. If you want the details and haven't been able to dig it up on line, send me a message or leave me a comment and I'll see what I can do, or better yet, go buy the book! You won't be sorry! You get the recipe and method for the main loaf, and TONS of variations!! People, this is so easy a caveman could do it! REALLY!
Here are some pictures from our most recent endeavor!
Now this isn't squishy wonder bread guys, this bread has some tooth to it. I loved it shmeared with butter right out of the oven, or rubbed with garlic and butter with some spaghetti. It has a hint of sour dough flavor to it, because it sat for a few days before we baked it. There's more in the fridge. Can't wait to make the next loaf. You know, it will only take five minutes to pop it in the oven, and fresh bread in 30 mins. Do you remember what the house smells like when you bake fresh bread? Do you? Aww you should go make some now!
Char
When I heard about this recipe for making bread in five minutes a day,and no kneading was involved, I was totally all in. For some reason, I just can't figure out the kneading! If you watch the videos and look at the pictures, you can CLEARLY tell which bread grampy had his hands on, and which bread I had mine on. I know I should practice, because in this case, truly practice does make perfect, but I haven't found the patience for it yet. I will someday, and thankfully, I'll have Grampy by my side showing me how he kneaded the bread with perfection.
The recipe for Artisian Bread in Five minutes a day, is dead simple.
3 cups lukewarm water
1 1⁄2 tbsp granulated yeast (1 1⁄2 packets)
1 1⁄2 tbsp coarse kosher or sea salt
6 1⁄2 cups unsifted, unbleached, all-purpose white flour
Cornmeal for pizza peel
I like to add just a pinch of sugar.
The beauty is in the method. If you want the details and haven't been able to dig it up on line, send me a message or leave me a comment and I'll see what I can do, or better yet, go buy the book! You won't be sorry! You get the recipe and method for the main loaf, and TONS of variations!! People, this is so easy a caveman could do it! REALLY!
Here are some pictures from our most recent endeavor!
 |
| Dough in container immediately after mixing. |
 |
| Dough in container after three hour rise at room temp. |
 |
| Risen dough after 3 hours at room temp, about tripled. We refrigerated it at this point. |
 |
| All I had to do here was make it into a smooth silky ball by tucking the ends under... Meh... |
 |
| I slashed the top for a scalloped effect in the finished product... ha |
 |
| Yes, well you see, it looks beautiful anyway! |
 |
| The taste... Oh Ma Gah! It was fantastic! |
Char
Saturday, January 22, 2011
The Big Green Egg and a hunk of beef two ways (Part 2 of 2) Chili!
Welcome to part 2!
So we had this beef in the fridge, and since it was a little on the dry side, but it had lots of flavor, we thought it would make good chili. It sure did!

So delicious!
Char
So we had this beef in the fridge, and since it was a little on the dry side, but it had lots of flavor, we thought it would make good chili. It sure did!
 |
| John slicing the green pepper |
 |
| Chopping the green pepper |
 |
| Chopping up the celery |
 |
| Onions, garlic, celery and pepper ready to go |
 |
| Sliced beef |
 |
| Sliced and diced beef ready for the sauteed vegetables |
 |
| All the meat, spices and veg |
 |
| Tomatoes, tomato sauce, beans and vegetables... everyone in the hot tub to simmer! |

So delicious!
Char
The Big Green Egg and a hunk of beef two ways (Part 1 of 2)
Almost two years ago, we decided that instead of putting a large hunk of money into another "disposable" grill from Home Depot, that we would spend a bit more money and have a grill that lasts a lifetime. We haven't regretted a moment of it.
Last weekend, I had an eye round roast, and had planned on cooking it in the oven, low and slow a la a recipe that an old boss of mine made for Christmas parties. The beef comes out super tender and rare. John mentioned that he'd like to try it on the BGE, but I had a little reservations about it, because it can sometimes be difficult for me to keep the BGE very low, which is what this cut needs. I was fretting about it, and not exactly sure what I should do, or how to go about it, and John said to just get started and it would come to me. He was at work, and I had this hunk of meat, so here we went...
We haven't used the BGE in a while, so it took a bit of time to get it prepped and ready, plus I had already soaked some mesquite chunks. It was going strong
Ready to throw the meat on after placing the probe thermometer and shielding it from the heat


Done... It ended up being a bit too dry. It cooked a little higher than I would have liked, and I pulled it at 130 degrees and I probably should have pulled it at 115 degrees especially considering the amount of time that it sat before we ate it. We ended up chopping it up and putting it on a salad and had it along side of the falafel below. It was delicious! Nice pink smoke ring too, which you'll see in dish two.


Needless to say, we had a bunch of meat left, and we've been meaning to make chili with it all week. We finally got it going today
I think I'm going to make this a two part series :) Part two coming in a few minutes.
Char
Last weekend, I had an eye round roast, and had planned on cooking it in the oven, low and slow a la a recipe that an old boss of mine made for Christmas parties. The beef comes out super tender and rare. John mentioned that he'd like to try it on the BGE, but I had a little reservations about it, because it can sometimes be difficult for me to keep the BGE very low, which is what this cut needs. I was fretting about it, and not exactly sure what I should do, or how to go about it, and John said to just get started and it would come to me. He was at work, and I had this hunk of meat, so here we went...
 |
| Nice sized eye round of beef rubbed with our Memphis Rub |
We haven't used the BGE in a while, so it took a bit of time to get it prepped and ready, plus I had already soaked some mesquite chunks. It was going strong
 |
| BGE Chugging along |


Done... It ended up being a bit too dry. It cooked a little higher than I would have liked, and I pulled it at 130 degrees and I probably should have pulled it at 115 degrees especially considering the amount of time that it sat before we ate it. We ended up chopping it up and putting it on a salad and had it along side of the falafel below. It was delicious! Nice pink smoke ring too, which you'll see in dish two.


Needless to say, we had a bunch of meat left, and we've been meaning to make chili with it all week. We finally got it going today
I think I'm going to make this a two part series :) Part two coming in a few minutes.
Char
Generosity
Working for generous people, is always a plus. What's even better is working for generous people who have generous friends.
Thanks to one of my bosses, this is what we had for dinner last night, gratis... courtesy of him!
I picked up some scallops and wrapped them in bacon just to gild the lily :-)
What a fantastic dinner. I'm a lucky girl.
Char
Thanks to one of my bosses, this is what we had for dinner last night, gratis... courtesy of him!
 |
| Stone crab claws with drawn butter |
 |
| Fresh rock shrimp from the east coast waters |
I picked up some scallops and wrapped them in bacon just to gild the lily :-)
 |
| Handmade bacon wrapped scallops with cucumber dill sauce |
Char
Thursday, January 20, 2011
Breakfast of Champions
Well I dunno about champions, but it really works for me.
I love me some bananas and peanut butter. So I cut up a banana, and put a dollop of crunchy peanut butter on top. Consume with fork. (Pinky out optional).
C
I love me some bananas and peanut butter. So I cut up a banana, and put a dollop of crunchy peanut butter on top. Consume with fork. (Pinky out optional).
 |
| Crunchy Peter Pan with a perfectly ripe banana! |
Monday, January 17, 2011
Falafel you say?
I made this for the first time last night, and it was REALLY good! I've always been a fan of falafel, but this homemade stuff is not only delicious, but the best I've ever had. I used my cucumber dill sauce for dipping. It's also fantastic on salmon, but you can use a classic tahini sauce if you prefer.

Falafel – Mark Bittman
Yield 6 to 8 servings
Time 1 hour, plus 24 hours
First, keep the amount of water you use when grinding the beans to an absolute minimum. More water makes grinding easier, but it also virtually guarantees that the batter will fall apart when it hits the hot oil. If this happens, bind the remaining mixture by stirring in a little flour.

The second essential step is to get the oil hot enough: 350 degrees or a little higher. If you don\'t have a thermometer, just wait until the oil shimmers and then add a pinch of the batter. When it sizzles immediately, sinks about halfway to the bottom, then rises to the top, the oil is ready. If it sinks and stays down, the oil is too cold; if it doesn't sink at all, the oil is too hot.
 Ingredients
• 1 3/4 cup dried chickpeas
• 2 cloves garlic, lightly crushed (I added more like 8)
• 1 small onion, quartered
• 1 teaspoon ground coriander
• 1 tablespoon ground cumin
• Scant teaspoon cayenne, or to taste (I only used a ¼ tsp)
• 1 cup chopped parsley or cilantro leaves
• 1 teaspoon salt
• 1/2 teaspoon black pepper
• 1/2 teaspoon baking soda
• 1 tablespoon lemon juice (I used half a lemon)
• Neutral oil, like grapeseed or corn, for frying
Method
1. Put the beans in a large bowl and cover with water by 3 or 4 inches; they will triple in volume. Soak for 24 hours, adding water if needed to keep beans submerged.

2. Drain beans well (reserve soaking water) and transfer to a food processor. Add remaining ingredients except oil; pulse until minced but not pureed, scraping sides of bowl down; add soaking water if necessary to allow machine to do its work, but no more than 1 or 2 tablespoons. Keep pulsing until mixture comes together. Taste, adding salt, pepper, cayenne or lemon juice to taste.
3. Put the oil in a large, deep saucepan to a depth of at least 2 inches; more is better. The narrower the saucepan the less oil you need, but the more oil you use the more patties you can cook at a time. Turn heat to medium-high and heat oil to about 350 degrees (a pinch of batter will sizzle immediately).
4. Scoop heaping tablespoons of batter and shape into balls or small patties. Fry in batches, without crowding, until nicely browned, turning as necessary; total cooking time will be less than 5 minutes. Serve hot or at room temperature.


Cucumber-Dill Sauce:
Comments: This sauce is amazing. I made it with some Salmon the other day and it's so good, I wanted to just eat the sauce when I ran out of fish.
1/3 cup peeled, seeded, cucumber
1/3 cup low fat sour cream
1/3 cup low fat plain yogurt
2 teaspoons chopped fresh dillweed (or more to taste)
1 clove garlic, minced
Kosher salt and freshly ground black pepper to taste
Take the cucumber, dillweed, garlic, salt and pepper and process in food processor. Mix in sour cream and plain yogurt. Taste for seasoning. Chill or serve immediately over your favorite meat.
My favorite way to make salmon is to rub it with a little olive oil, garlic salt and cajun seasoning and bake/broil until crispy and done.
Char

Falafel – Mark Bittman
Yield 6 to 8 servings
Time 1 hour, plus 24 hours
First, keep the amount of water you use when grinding the beans to an absolute minimum. More water makes grinding easier, but it also virtually guarantees that the batter will fall apart when it hits the hot oil. If this happens, bind the remaining mixture by stirring in a little flour.

The second essential step is to get the oil hot enough: 350 degrees or a little higher. If you don\'t have a thermometer, just wait until the oil shimmers and then add a pinch of the batter. When it sizzles immediately, sinks about halfway to the bottom, then rises to the top, the oil is ready. If it sinks and stays down, the oil is too cold; if it doesn't sink at all, the oil is too hot.

• 1 3/4 cup dried chickpeas
• 2 cloves garlic, lightly crushed (I added more like 8)
• 1 small onion, quartered
• 1 teaspoon ground coriander
• 1 tablespoon ground cumin
• Scant teaspoon cayenne, or to taste (I only used a ¼ tsp)
• 1 cup chopped parsley or cilantro leaves
• 1 teaspoon salt
• 1/2 teaspoon black pepper
• 1/2 teaspoon baking soda
• 1 tablespoon lemon juice (I used half a lemon)
• Neutral oil, like grapeseed or corn, for frying
Method
1. Put the beans in a large bowl and cover with water by 3 or 4 inches; they will triple in volume. Soak for 24 hours, adding water if needed to keep beans submerged.

2. Drain beans well (reserve soaking water) and transfer to a food processor. Add remaining ingredients except oil; pulse until minced but not pureed, scraping sides of bowl down; add soaking water if necessary to allow machine to do its work, but no more than 1 or 2 tablespoons. Keep pulsing until mixture comes together. Taste, adding salt, pepper, cayenne or lemon juice to taste.
3. Put the oil in a large, deep saucepan to a depth of at least 2 inches; more is better. The narrower the saucepan the less oil you need, but the more oil you use the more patties you can cook at a time. Turn heat to medium-high and heat oil to about 350 degrees (a pinch of batter will sizzle immediately).
4. Scoop heaping tablespoons of batter and shape into balls or small patties. Fry in batches, without crowding, until nicely browned, turning as necessary; total cooking time will be less than 5 minutes. Serve hot or at room temperature.


Cucumber-Dill Sauce:
Comments: This sauce is amazing. I made it with some Salmon the other day and it's so good, I wanted to just eat the sauce when I ran out of fish.
1/3 cup peeled, seeded, cucumber
1/3 cup low fat sour cream
1/3 cup low fat plain yogurt
2 teaspoons chopped fresh dillweed (or more to taste)
1 clove garlic, minced
Kosher salt and freshly ground black pepper to taste
Take the cucumber, dillweed, garlic, salt and pepper and process in food processor. Mix in sour cream and plain yogurt. Taste for seasoning. Chill or serve immediately over your favorite meat.
My favorite way to make salmon is to rub it with a little olive oil, garlic salt and cajun seasoning and bake/broil until crispy and done.
Char
Sunday, January 9, 2011
Chicken with Indian Spices and Yogurt
For a self professed foodie, I sure don't put many recipes on my blog! That picture at the header, I made that. I actually created it from taste after I got it from a local specialty market in town. I love love love to cook, I love to eat, and I married a chef! :)
Here's the first of hopefully many recipes with pictures to appear on the blog.
Chicken with Indian Spices and Yogurt
(Adapted From Mark Bittman’s How to Cook Everything)

Sweet, saucy and warming. Wonderful over rice pilaf, white or brown basmati rice. For extra flavor, start with whole cumin, coriander, cardamom and cinnamon and toast and grind them yourself.
Ingredients:
¼ cup peanut, grapeseed, corn or other neutral oil
Salt and freshly ground pepper, to taste
4-6 chicken thighs or other parts, rinsed and patted dry
1 large or 2 medium onions, chopped
4 tablespoons minced garlic
1 tablespoon peeled and grated fresh ginger (or 1 teaspoon ground ginger)
1/2 teaspoon cayenne, or to taste (I used ¼ tsp.)
1 teaspoon ground cumin
1 teaspoon ground coriander
1 teaspoon ground cardamom
1/2 teaspoon ground turmeric
1/2 teaspoon ground cinnamon
2 cups plain yogurt
Minced cilantro leaves for garnish
Directions:
Heat oil over medium-high heat in a large, deep skillet, Dutch oven, or casserole. When the oil is hot add chicken skin side down to oil, and brown it well, rotating and turning the pieces as necessary; the process will take 10-15 minutes. (You can skip this part if you like, as noted in the Braised Chicken Parts section; heat a T of oil and go directly to cooking the onions.)
When the chicken is nicely browned, remove it from the skillet and pour off all but a couple of tablespoons of oil. Turn heat to medium, and add the onion along with some salt and pepper. Cook, stirring, until they soften, about 5 minutes.
Add the garlic, ginger and spices along with an additional 1/2 teaspoon of pepper. Cook with the onions, stirring, until very aromatic, about 2 or 3 minutes. Stir in the yogurt, then add the chicken pieces back to the pan.

Cover and cook over medium-low heat so that the mixture doesn’t boil, turning the pieces every 5 minutes or so, until the chicken is cooked through 10 to 20 minutes (longer if you skipped the browning step); It’s ok if the mixture curdles a bit. The chicken is done when an instant read thermometer inserted into the thickest part of the thigh reads 155-165 degrees F, 20 to 30 minutes.
Taste and adjust seasoning, garnish with cilantro and serve.
Bittman says: Boneless chicken breasts are an undeniably convenient weeknight diner choice, but bone-in chicken parts are just as simple to prepare and infinitely more favorful (and less expensive!). When you braise chicken parts in a seasoned liquid, you get a comforting meal with plenty of sauce for rice, noodles or bread – with very little effort, in less than an hour. Chicken with Yogurt and Indian Spices takes only 45 minutes to cook, yet tastes like it’s been braising for much longer. And if you’re really pressed for time, don’t bother to brown the chicken first; just skip Step 1 and proceed with the onions as described in step 2.
Char says: If you find that your sauce has curdled, puree it to smoothness using a stand or immersion blender. I also ended up adding about ½ cup milk and cream to smooth the mixture out. 1-9-11 John and I really liked this, I think some coconut milk would be a good addition also.
Char
Subscribe to:
Posts (Atom)


